PHP7 is available from Ubuntu 16.04 LTS Xenial Xerus so you no longer have to rely on third-party PPA to get PHP7 installed on Ubuntu 16.04. In this tutorial, we are going to look at how to install Nginx, MariaDB and PHP7-FPM (LEMP stack) on Ubuntu 16.04 LTS Xenial Xerus.
Step 1: Update Ubuntu 16.04 LTS
Before we install any software, it’s always a good idea to update repository and software packages. SSH into your Ubuntu 16.04 server and enter the below commands.
sudo apt update

sudo apt upgrade
Step 2: Install Nginx Web Server
Nginx is a high performance web server. It also can be used as a
reverse proxy. Enter this command to install Nginx Web server.sudo apt install nginx
After it’s installed, we can enable Nginx to auto start when Ubuntu is booted by running the following command.
sudo systemctl enable nginx
Then start Nginx with this command:
sudo systemctl start nginx
Now check out its status.
systemctl status nginx
Output:
● nginx.service - A high performance web server and a reverse proxy server
   Loaded: loaded (/lib/systemd/system/nginx.service; enabled; vendor preset: enabled)
   Active: active (running) since Sat 2016-06-04 08:31:23 EDT; 1 day 2h ago
 Main PID: 298 (nginx)
   CGroup: /system.slice/nginx.service
     ├─298 nginx: master process /usr/sbin/nginx -g daemon on; master_process on
     └─299 nginx: worker process
“enabled” indicates that auto start at boot time is enabled and we can see that Nginx is running.
Now in your browser’s address bar, type the public IP address of Ubuntu 16.04 LTS server. You should see the “Welcome to nginx!” Web page which means Nginx Web server is running correctly.
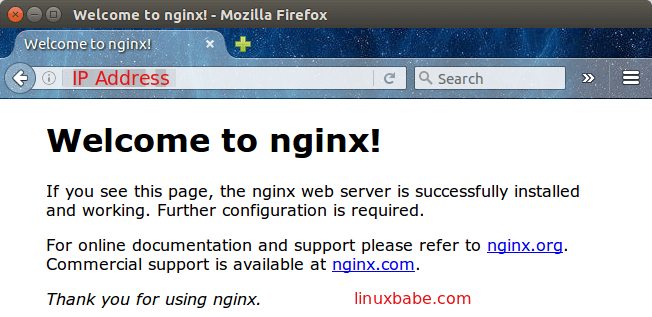
You can use the following command to fetch the public IP address of Ubuntu 16.04 server.
sudo apt install curl

curl http://icanhazip.com
If you are installing LEMP on your local Ubuntu 16.04 box, just type 127.0.0.1 or localhost in
the browser address bar.
Finally, we need to make www-data (Nginx
user) as the owner of web root directory.
sudo chown www-data /usr/share/nginx/html -R
Step 3: Install MariaDB
MariaDB is a drop-in replacement for MySQL. It is developed by former members of MySQL team who concerned that Oracle might turn MySQL into a closed-source product. Many Linux distributions (Arch Linux, Fedora etc), companies and organizations (Google, Wikipedia) have migrated to MariaDB. So we’re going to install MariaDB instead of MySQL.
sudo apt install mariadb-server mariadb-client
After it’s installed, MariaDB server should be automatically started. Use systemctl to check its status.
systemctl status mysql
Output:
● mysql.service - LSB: Start and stop the mysql database server daemon
 Loaded: loaded (/etc/init.d/mysql; bad; vendor preset: enabled)
 Active: active (running) since Wed 2016-04-20 18:52:01 EDT; 1min 30s ago
 Docs: man:systemd-sysv-generator(8)
If it’s not running, start it with this command:
sudo systemctl start mysql
To enable MariaDB to automatically start when Ubuntu 16.04 is rebooted:
sudo systemctl enable mysql
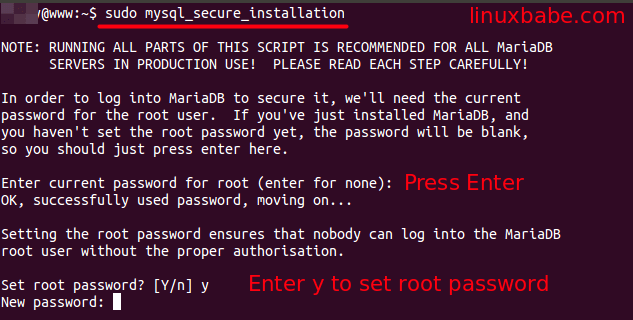
Now run the post installation security script.
sudo mysql_secure_installation
When it asks you to enter MariaDB root password, press enter because you have not set the root password yet. Then enter y to set the root password for MariaDB server.
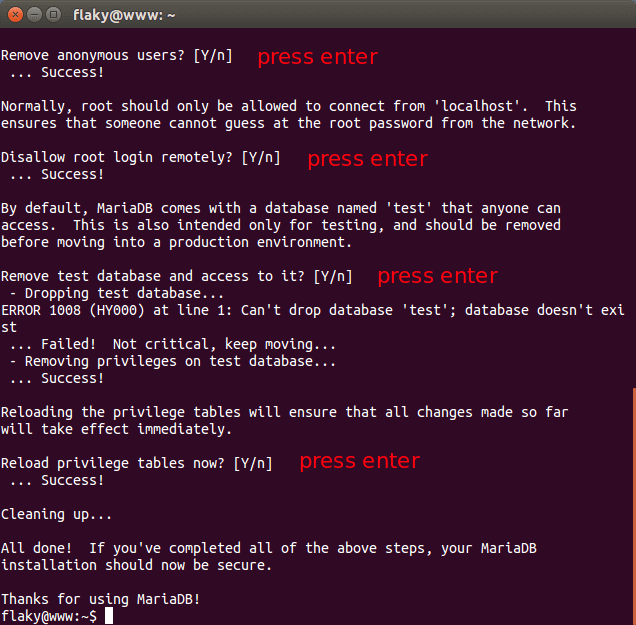
Next you can just press Enter to answer all the remaining questions. This will remove anonymous user, disable remote root login and remove test database. This step is a basic requirement for MariaDB database security.
Step 4: Install PHP7
Enter the following command to install PHP7 and PHP7 extensions.
sudo apt install php7.0-fpm php7.0-mbstring php7.0-xml php7.0-mysql php7.0-common php7.0-gd php7.0-json php7.0-cli php7.0-curl
PHP extensions are commonly needed for content management systems (CMS) like WordPress. For example, if your installation lacks php7.0-xml, then some of your WordPress site page may be blank and you can find an error in Nginx error log like:
PHP message: PHP Fatal error: Uncaught Error: Call to undefined function xml_parser_create()
Installing these PHP extensions ensures that your CMS runs smoothly.
Now start php7.0-fpm.
sudo systemctl start php7.0-fpm
Check status:
systemctl status php7.0-fpm
Sample output:
● php7.0-fpm.service - The PHP 7.0 FastCGI Process Manager
 Loaded: loaded (/lib/systemd/system/php7.0-fpm.service; enabled; vendor pre
set: enabled)
 Active: active (running) since Wed 2016-04-20 19:21:05 EDT; 2s ago
Step 5: Create a Default Nginx Server Block File
Remove the default symlink in sites-enabled directory.
sudo rm /etc/nginx/sites-enabled/default
Then create a new default server block file under /etc/nginx/conf.d/ directory.
sudo nano /etc/nginx/conf.d/default.conf
Paste the following text into the file. Replace 12.34.56.78 with your actual server IP.
server {
  listen 80;
  listen [::]:80;
  server_name 12.34.56.78;
  root /usr/share/nginx/html/;
  index index.php index.html index.htm index.nginx-debian.html;

  location / {
    try_files $uri $uri/ =404;
  }

  error_page 404 /404.html;
  error_page 500 502 503 504 /50x.html;

  location = /50x.html {
    root /usr/share/nginx/html;
  }

  location ~ \.php$ {
    fastcgi_pass unix:/run/php/php7.0-fpm.sock;
    fastcgi_param SCRIPT_FILENAME $document_root$fastcgi_script_name;
    include fastcgi_params;
    include snippets/fastcgi-php.conf;
  }

  location ~ /\.ht {
    deny all;
  }
}
Save and close the file. Then test nginx configuration and reload it.
sudo nginx -t

sudo systemctl reload nginx
Step 6: Test PHP
To test the cli version of PHP7, we just need to enter this command:
php --version
Sample output:
PHP 7.0.15-7ubuntu2 (cli) ( NTS )
Copyright (c) 1997-2016 The PHP Group
Zend Engine v3.0.0, Copyright (c) 1998-2016 Zend Technologies
  with Zend OPcache v7.0.6-dev, Copyright (c) 1999-2016, by Zend Technologies
To test PHP-FPM, first create a test.php file
in the Web root directory.
sudo nano /usr/share/nginx/html/test.php
Paste the following PHP code into the file.
<?php phpinfo(); ?>
Save and close the file. Now in the browser address bar, enter server-ip-address/test.php.
Replace sever-ip-address with
your actual IP. You should see your server’s PHP information. This means PHP
processing is fine.
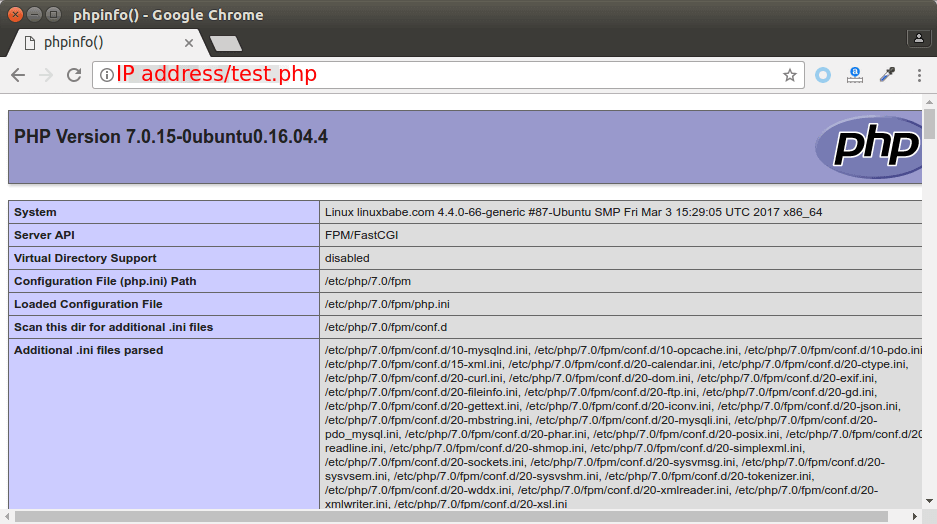
For your server’s security, you should delete test.php file
now.
Congrats! You have successfully installed Nginx, MariaDB and PHP7 (LEMP stack) on Ubuntu 16.04 LTS Xenial Xerus.
Comments, questions or suggestions are always welcome. If you found this post useful, please share it with your friends on social media! Stay tuned for more Linux tutorials.