Deluge is included in the official Ubuntu repository but is quite outdated. The Deluge Team has its own PPA which always provides the current version. I strongly recommend installing Deluge using the official PPA.
Add the required PPA to your system
sudo add-apt-repository ppa:deluge-team/ppaUpdate the repository and install the Deluge Daemon (deluged) and the Deluge Web UI (deluge-web)
sudo apt-get update
sudo apt-get install deluged deluge-console deluge-web -y
Both Deluge daemon and Deluge Web UI logs will be located at /var/log/deluge.
You can’t start Deluge daemon and Deluge Web UI until you configure the log
directory and the permissions. With the first line we create the required
directory, with the second we modify ownership to user and group vpn, and with
the third line we set the required permissions.
sudo mkdir -p /var/log/deluge
sudo chown -R vpn:vpn /var/log/deluge
sudo chmod -R 770 /var/log/deluge
Note: the chmod value 770 grants
full access to the vpn user and to members of the vpn group.
Finally, configure log rotation to properly maintain logs
sudo nano /etc/logrotate.d/delugeInsert the following to rotate the logs
/var/log/deluge/*.log {
        rotate 4
        weekly
        missingok
        notifempty
        compress
        delaycompress
        sharedscripts
        postrotate
                initctl restart deluged >/dev/null 2>&1 || true
                initctl restart deluge-web >/dev/null 2>&1 || true
        endscript
}
Hit Ctrl + X, Y to save and exit.
One of the cool features of Deluge is that it allows you to run and control the daemon and the Web UI independently, even as different users.
If you want to retain direct access to the Web UI, then you need to run the Web UI service (attention: only the Web UI, not the daemon!) as your regular user, although I strongly recommend to run Web UI as vpn user and use nginx reverse proxy — we will follow this approach in this guide. The next step is to configure the Deluge daemon to run as the vpn user.
The user who will run Deluge daemon is the vpn user. Logs will be located at /var/log/deluge.
We are using umask
007 value to grant full access to the user and members of the group the
Deluge daemon is running as and prevents access for all other users.
When installing Deluge from PPA on Ubuntu 16.04 there is no systemd unit created
by default, which is actually great since we can create our and adjust easily to
our needs, in this case for vpn split tunnel. We will also make sure Deluge is
started after the tun0 interface
is created to prevent accidental ip leaks.
Create the Deluge daemon service unit
sudo nano /etc/systemd/system/deluged.serviceCopy and paste the following
[Unit]
Description=Deluge Bittorrent Client Daemon
After=network-online.target sys-devices-virtual-net-tun0.device
Wants=sys-devices-virtual-net-tun0.device

[Service]
Type=simple
User=vpn
Group=vpn
UMask=007

ExecStart=/usr/bin/deluged -d -l /var/log/deluge/daemon.log -L warning

Restart=on-failure
# Configures the time to wait before service is stopped forcefully.
TimeoutStopSec=300

[Install]
WantedBy=multi-user.target
Hit Ctrl + X, Y to save and exit.
Enable the created service unit
sudo systemctl enable deluged.serviceWe will create a separate systemd unit for Deluge Web UI. By default, when the Deluge daemon is started or stopped, the Web UI is also started or stopped automatically. However, Deluge lets you control the Web UI separately.
Create the Deluge Web UI systemd unit
sudo nano /etc/systemd/system/deluge-web.serviceCopy and paste the following
[Unit]
Description=Deluge Bittorrent Client Web Interface
After=network-online.target sys-devices-virtual-net-tun0.device
Wants=sys-devices-virtual-net-tun0.device

[Service]
Type=simple

User=vpn
Group=vpn
UMask=027

ExecStart=/usr/bin/deluge-web -l /var/log/deluge/web.log -L warning

Restart=on-failure

[Install]
WantedBy=multi-user.target
Hit Ctrl + X, Y to Save and Exit.
Enable the created service unit
sudo systemctl enable deluge-web.serviceWhen you start the Deluge Web UI, after entering the password (default is deluge, I recommend to change it at first login) it will always prompt you to select the Deluge daemon you would like to connect to. This is because you can have more Deluge daemons running so this is where you can select to which Deluge daemon you would like to connect from the Web UI. I assume that you are running one instance of Deluge daemon on your server, therefore it is preferred to configure auto connect.
Note: Transdrone requires auto connect enabled to work – more on this in a later guide.
Stop Deluge daemon to edit the web.conf file
sudo systemctl stop deluged.serviceMake sure the Web Ui is also stopped
sudo systemctl stop deluge-web.service
Edit the created web.conf file
sudo nano /home/vpn/.config/deluge/web.confFind the line
"default_daemon": "";and set it to
"default_daemon": "127.0.0.1:58846"Hit Ctrl + X, Y to save and Exit.
Start Deluge daemon
sudo systemctl start deluged.service
Make sure Web UI is also started
sudo systemctl start deluge-web.serviceNow when you log into Deluge Web UI, it will automatically connect to the Deluge daemon.
In order to make sure that none of the services included in Deluge are going to leak your IP address, I recommend to set the following settings. The following recommendations are based on many discussions on different forums.
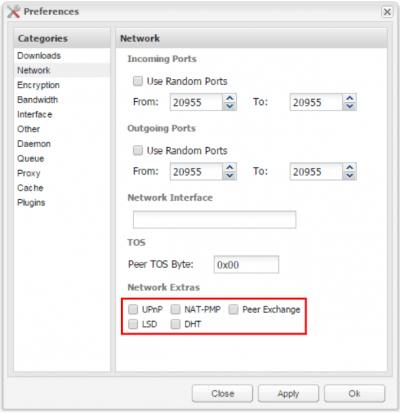
In Deluge Web UI go to Preferences and Network tab. Disable all the Network Extras: UPnP, NAT-PMP, Peer Exchange, LSD, DHT, as you can see on the screenshot
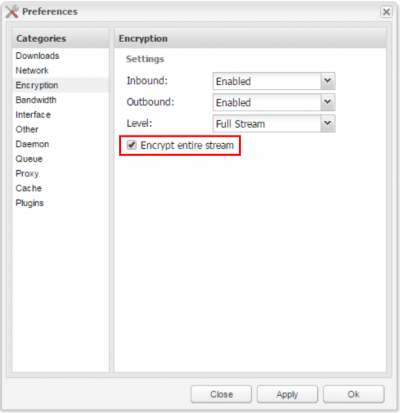
Next step is to proceed to Encryption tab, and make sure Encrypt entire stream is selected, and set the other settings as you can see on the screenshot below. This level of encryption is enough, especially when used over VPN that is already encrypted.
Note: when running Deluge over VPN connection there will be no open ports by default. This is fine if you don’t need upload for private trackers or you don’t want to make a larger upload contribution as an active seeder (please consider seeding to keep torrents alive). Opening ports for active connection decreases the security of the VPN connection in some extent, but it is still generally considered to be safe. PIA offers port forwarding on selected servers, stay tuned for a separate guide on how to configure Deluge with port forwarding and split tunnel VPN, we will update the link here when the guide is published!
At this point you should have a fully working VPN with Split Tunneling and a running Deluge client tunneled over the VPN connection. To access Deluge Web UI you need to create a reverse proxy, you can’t access the Web UI even from local network directly. The following part will show you how to configure nginx reverse proxy in less then five minutes. A very important note: this configuration uses plain, unencrypted http connection for nginx.
If you plan to access Deluge from outside of your local network you should consider configuring nginx with a secure SSL/TLS certificate using our guide Secure nginx Reverse Proxy with Let’s Encrypt, or alternatively you can configure with a self-signed certificate following the guide Enforce SSL for Secure nginx Reverse Proxy Linux (now that Let’s Encrypt provides free valid certificates, I strongly recommend to use it).
If you need access to Deluge (or other services) only from your local network, then you can use the following simple nginx configuration.
Note: If you already have nginx installed and configured, just make sure you add the location part below marked with blue to your nginx virtual host file.
Update repository and install nginx
sudo apt-get update
sudo apt-get install nginx -y
Unlink the default nginx virtual host
sudo unlink /etc/nginx/sites-enabled/defaultCreate the nginx virtual host file
sudo nano /etc/nginx/sites-available/reverse
Paste the nginx Deluge configuration and replace htpcguides.crabdance.com with
your dynamic DNS address and 192.168.1.100 with
the device’s local IP.
Usually for reverse proxy support we set a custom web root in the application
itself but Deluge support setting a special header for the web root. Here the
web root is deluge, it must match for the location and the X-Deluge-Base header.
This assumes Deluge is running on the same device as nginx, if it isn’t then
change 127.0.0.1 to
match the local IP address of Deluge.
If you already
have an nginx reverse proxy virtual host you only need to
add the location block marked with blue (do
not copy the last } at
the bottom)
server {
listen 80;
server_name htpcguides.crabdance.com 192.168.1.100;

    location /deluge {
     proxy_pass        http://127.0.0.1:8112/;
     proxy_set_header  X-Deluge-Base "/deluge/";
    }
}
Ctrl+X, Y and Enter to save the deluge nginx reverse proxy virtual host
Symbolically link the virtual host so nginx will load it when the service is reloaded (if you already created a reverse virtual host, skip this step)
sudo ln -s /etc/nginx/sites-available/reverse /etc/nginx/sites-enabled/reverseTest the nginx configuration is valid
sudo nginx -tIf you got no errors then restart nginx
sudo systemctl restart nginx.serviceMake sure Deluge is running
sudo systemctl start deluged.service
Now you can use your local IP address http://ip.address/deluge or
dynamic DNS address at http://yourdns.address/deluge
to access Deluge outside your home network. The default password for Deluge Web
UI is deluge (strongly recommended to change it at first login).
Finally, we want to make sure that Deluge is using the VPN tunnel. A simple and reliable way to check this is to download a torrent file from TorGuard. They have a great service called Check My Torrent IP Address. To download the torrent file click on

Alternatively, you can Save Link Location (Firefox) or Copy link address (Chrome) and copy directly into Deluge’s + Add URL field. The important part is the IP address under Tracker Status, marked with red. It should be the VPN server’s IP address.
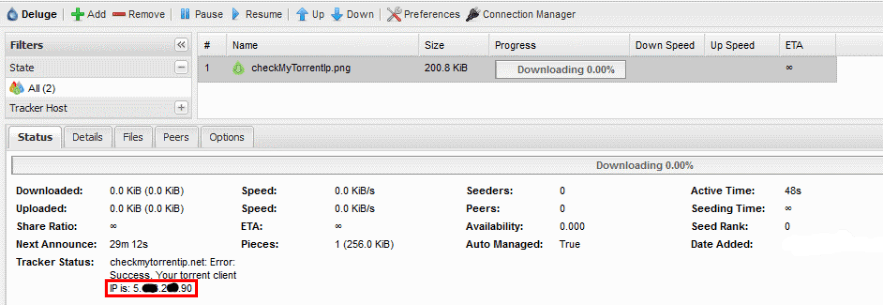
You can copy the IP address and check with IP Tracker. Just paste the IP address and the result should show you the location. Make sure it matches the VPN server’s location you use (in our case it is Sweden).
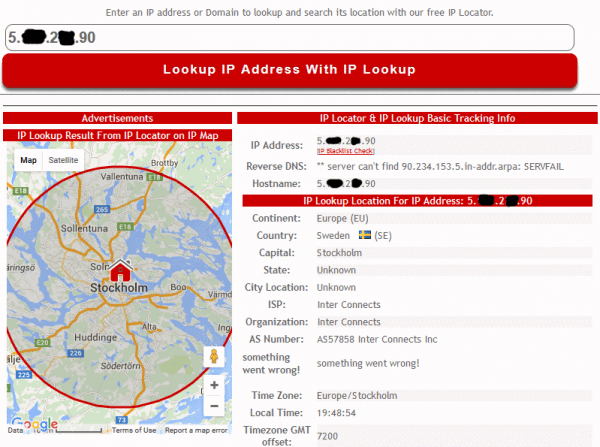
If the IP Lookup matches the VPN server’s location, you successfully configured Deluge for VPN Split Tunneling.
A final word on security (I know I mentioned this several times): if you configured nginx to be accessible from outside of the home network, make sure you use SSL/TLS and not plain http protocol. Let’s make the web a safer place by using the free SSL certificates!
In the VPN Split Tunnel guide we recommended to add your regular user to the vpn group, and to add vpn user to your regular user’s group. It is important to avoid any permission related issues with the downloaded torrents. We configured Deluge’s permissions for downloaded torrents to be fully accessible (read, write, execute) by vpn user and members of the vpn group.
If you use any automation tool like Sonarr or CouchPotato, the user who is
running these services should be added to the vpn group. Make sure you add any
users that run automation software to the vpn group like this by replacing user-running-automation.
sudo usermod -aG vpn user-running-automation