Step 1: Setting Up OpenVPN Server on Ubuntu
1. Installing and configuring an OpenVPN server manually is not a simple task from my experience. That’s the reason, we will be using a script that lets you set up your own secure OpenVPN server in a matter of seconds.
Before downloading and running the script, note that the script will auto-detect your server’s private IP address, but you need to take note of your server’s public IP address especially if it is running behind NAT.
To find out your server’s public IP address, run the following wget command or dig command.
$ wget -qO - icanhazip.com OR $ dig +short myip.opendns.com @resolver1.opendns.com

Check Ubuntu Server IP Address
2. Now download the installer script using the curl command-line tool, then make it executable using the chmod command as follows.
$ curl -O https://raw.githubusercontent.com/angristan/openvpn-install/master/openvpn-install.sh $ chmod +x openvpn-install.sh
3. Next, run the executable installer script as shown.
$ sudo bash openvpn-install.sh
When executed for the first time, the script will ask you some questions, read them carefully, and provide answers according to your preferences, to set up your OpenVPN server.

Run OpenVPN Installer Script
4. Once the VPN installation process is complete, a client configuration file will be written under the current working directory. This is the file you will use to configure your OpenVPN client as described in the next section.

OpenVPN Installation Summary
5. Next, confirm that the OpenVPN service is up and running by checking its status using the following systemctl command.
$ sudo systemctl status openvpn
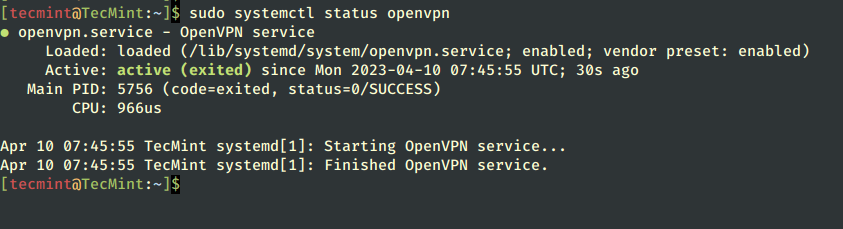
Check OpenVPN Service
6. Also, confirm that the OpenVPN daemon is listening on the port you instructed the script to use, using the ss command as shown.
$ sudo ss -tupln | grep openvpn

Check OpenVPN Listening Port
7. If you check your network interfaces, a new interface has been created for a VPN tunnel, you can confirm this by using the IP command.
$ ip add

Check VPN Tunnel Interface
Step 2: Setup OpenVPN Clients in Ubuntu
8. Now it’s time to set up your OpenVPN client and connect it to the VPN server. First, install the OpenVPN package in the client machine as follows.
$ sudo yum install openvpn #RHEL-based Systems $ sudo apt install openvpn #Debian-based Systems $ sudo dnf install openvpn #Fedora Linux
9. On a desktop system, you also need to install the network-manager-openvpn package to make VPN settings from the graphical interface.
$ sudo yum install network-manager-openvpn #RHEL-based Systems $ sudo apt install network-manager-openvpn #Debian-based Systems $ sudo dnf install network-manager-openvpn #Fedora Linux
10. After installing the above packages, start the OpenVPN service, for now, enable it to automatically start at system boot and check its status to confirm that it’s up and running.
$ sudo systemctl start openvpn $ sudo systemctl enable openvpn $ sudo systemctl status openvpn

Check OpenVPN Status
11. Now you need to import the OpenVPN client settings from the OpenVPN server. Open a terminal window and use the SCP command to grab the file as shown.
$ cd ~ $ scp [email protected]:/home/tecmint/tecmint.ovpn .

Import OpenVPN Client Settings
12. Open system Settings, then go to Networks. Under VPN, click the add button to get the necessary options.

Add New VPN Setting
13. In the pop-up window, choose “Import from file” as highlighted in the following screenshot. Then browse your file manager and select the .ovpn client config file you downloaded from the server.

Import VPN Settings

Select OpenVPN File to Import
14. On other Linux desktop systems, click on the network icon on the system panel, go to Network Connections. Then click the plus button to add a new connection. From the drop, select “Import a saved VPN configuration…” as highlighted in the following screenshot.
Create the connection and import the file.

Import VPN Client Settings
15. After importing the file, the VPN settings should be added as shown in the following screenshot. Then click Add.

VPN Settings Added
16. Your VPN client settings should be added successfully. You can connect to the OpenVPN server by turning on the VPN as highlighted in the following screenshot.

Connect to VPN
17. Now the VPN connection should be established successfully as shown in the following screenshot.

VPN Connection Successful
18. If you check your network interface connections using the IP add command, there should now exist a VPN tunnel interface as highlighted in the following screenshot.
$ ip add

Check VPN Tunnel Interface
Step 3: Setup OpenVPN Client in Linux
19. To connect another Linux server as a VPN client, ensure that you have installed the OpenVPN package, and started, and enabled the OpenVPN service as described above.
Then download the .ovpn client file, and copy it to the /etc/openvpn/ directory as shown.
$ scp [email protected]:/home/tecmint/tecmint.ovpn . $ ls $ sudo cp tecmint.ovpn /etc/openvpn/client.conf

Download Openvpn Client File
20. Next, start the VPN client service, enable it, and check its status with the following commands.
$ sudo systemctl start [email protected] $ sudo systemctl enable [email protected] $ sudo systemctl status [email protected]

Start OpenVPN Client Service
21. Then confirm that a VPN tunnel interface has been created using the IP add command as shown.
$ ip add

Confirm VPN Tunnel Interface
22. To set up other OpenVPN clients on operating systems, use the following clients:
- Windows: The official OpenVPN community client for Windows.
- Android: The OpenVPN client for Android.
- iOS: The official OpenVPN Connect client for iOS.
Step 4: Uninstall OpenVPN from Ubuntu
23. If you want to add a new VN user or revoke an existing user or remove the OpenVPN server from your system, simply run the installer script again. Then select what you wish to do from the list of options and follow the prompts.
$ sudo bash openvpn-install.sh

Remove OpenVPN in Ubuntu