 by
byThis article teaches you how you can generate a free Let’s Encrypt SSL certificate and install it on your Debian based web server, in a way that it automatically renews. With the launch of Let’s Encrypt in 2016, every web server administrator can now easily generate, install and renew an SSL certificate on their web server for free. Having an SSL certificate installed on your web server, secures all communication between a visitor of your website and your web server.
Background
The
topic of online security and privacy protection becomes more
and more important. With this in mind, an SSL certificate
helps you gain the trust of your website visitor. This
entices them for repeat visits. SSL stands for Secure Socket
Layer. Having an SSL certificate installed on your web
server, secures all communication between a visitor of your
website and your web server. Your web site visitor notices
that your URL starts with https:// instead
of http://.
Furthermore your website visitor sees a security icon in
their web browser’s address bar:

In the past you had to purchase a digital SSL certificate from a recognized certificate authority. Once purchased, you had to figure out how to install the SSL certificate manually on your web server. An SSL certificate comes with an expiration date. This means that after a certain amount of time, you have to purchase a renewal. Afterwards, you need to install the renewed SSL certificate on your web server. Because of the extra cost and work involved, only a few website operators went through this effort. Typically just online financial institutions and the larger online shops went through this effort.
This all changed when Let’s Encrypt launched in April of 2016. Let’s Encrypt is a non-profit certificate authority run by the Internet Security Research Group. They made it their mission to help secure online communication. As such, they offer SSL certificates for free together with tools for easy installation and renewal. Thanks to Let’s Encrypt every web server administrator can quickly and easily install an SSL certificate. It protects their website users and comes at no extra cost. This article teaches you how you can generate a free Let’s Encrypt SSL certificate and install it on your Debian based web server in a way that it automatically renews.
What you need
To
install a Let’s Encrypt SSL certificate on your Debian based
server, you just need an online Debian server with the
Apache HTTP server installed. For this article I prepared a
Debian virtual private server (VPS) at Linode,
installed a LAMP stack on it and configured it for the theplblog.com domain
name; A domain name I obtained purely for testing and
experimenting.
If you do not yet have a Debian based web server, you can quickly set one. Just follow the information in the following two articles:
For
testing out the procedure to install a Let’s Encrypt SSL
certificate on your Debian web server, you do not
necessarily need your own domain name. The Linode generated
one (xyz.members.linode.com)
suffices. However, if you want to use your own domain name
for your Linode VPS, follow the instructions in this
article:
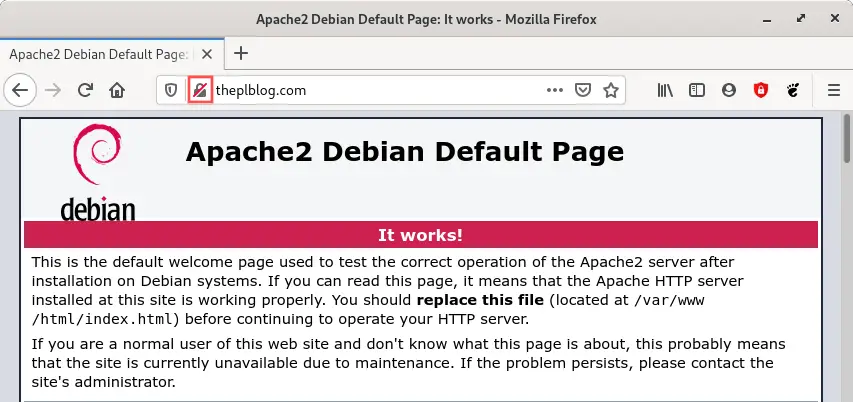
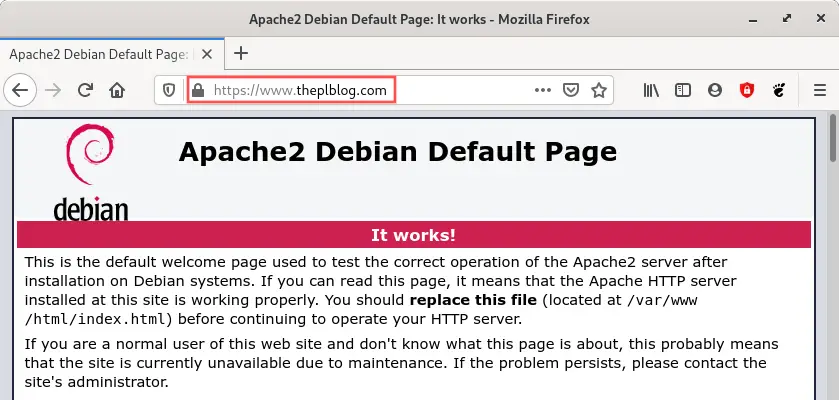
After
installing a LAMP stack on my Debian server, the Apache
default test page is available. This is what it looks like
before the Let’s Encrypt SSL certificate installation on
this Debian web server, when I visit http://www.theplblog.com:
If I try to access a secure version of the page (with https://)
the following happens:
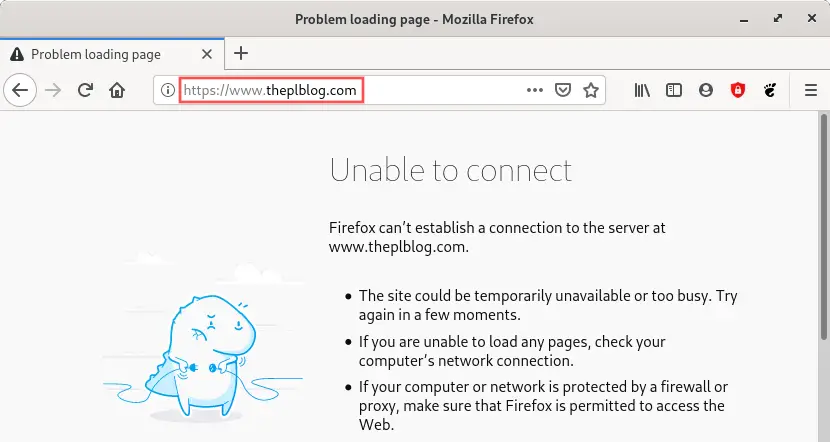
As you can see in, the website is not yet secured with an
SSL certificate and not yet available via https://.
In the sections below, we will install a Let’s Encrypt SSL
certificate on this Debian web server, to enable the secure
access to the website using https://.
Furthermore, the installation will be such that access to http:// automatically
redirects to the secure https:// version
of the website.
Install the Certbot tools
The Certbot package
contains tools for generating, installing and renewing Let’s
Encrypt SSL certificates. Since this article assumes that
the Apache HTTP server forms the foundation of your web
server, we just need to install the python3-certbot-apache package.
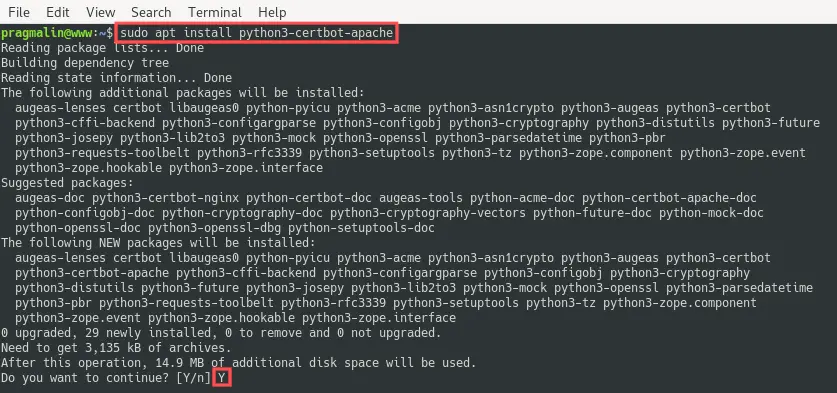
The Debian package repository already includes the python3-certbot-apache package.
This means that we just need to run the following command on
the Debian server to install it:
sudo apt install python3-certbot-apache
Set the server name in the Apache virtual host
The Certbot tools can generate an SSL certificate that links to one or more domains. Afterwards it can even automatically configure the SSL certificate for the Apache virtual host for the same domain(s). This automatic configuration of the Apache virtual host only works, if the ServerName directive (and optionally the ServerAlias directive) is properly configured.
From the perspective of just the Apache HTTP server, you do not need a properly configured ServerName directive, if you only have one enabled virtual host site on your server. Therefore you might not yet have the ServerName directive configured, just like me.
In my
case I want the website on my Debian web server to be
accessible using domain www.theplblog.com and theplblog.com as
an alias. I already created the corresponding DNS records
for my Linode VPS and configured these domains in /etc/hosts.
Refer to this
article for details on how to achieve this.
Since I did not yet configure the ServerName and ServerAlias directives
in the related Apache virtual host configuration file, let’s
proceed and take care of this configuration now.
As a first step we need to figure out where the name of the Apache virtual host configuration file. Run the following command to list all enabled Apache virtual host configuration files:
ls /etc/apache2/sites-enabled/

As expected, my server lists just one enabled Apache virtual
host. It’s the default site that Debian creates when
installing Apache. The one that serves files out of the /var/www/html/ directory.
Now that we know the name and location of the enabled Apache virtual host configuration file, we can edit it with Nano to configure the ServerName (and optionally the ServerAlias) directive:
sudo nano /etc/apache2/sites-enabled/000-default.conf
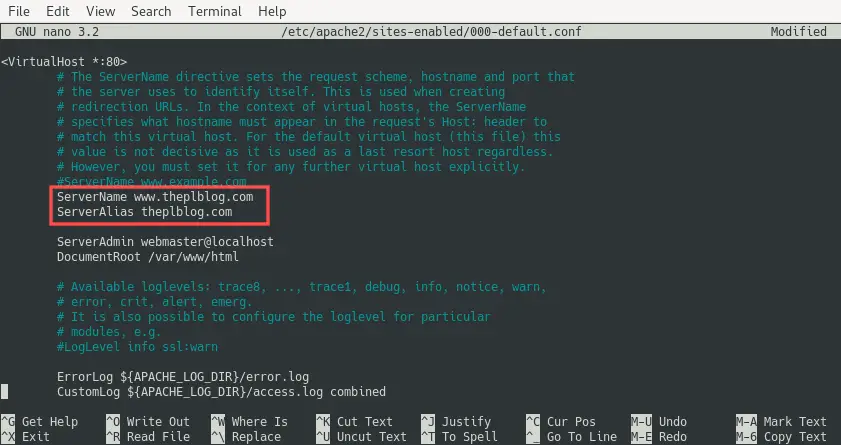
In my
case I want to set ServerName to www.theplblog.com and ServerAlias to theplblog.com.
Update these values for your domain name accordingly. Note
that you leave out ServerAlias,
in case you have no need for an alias. After editing the 000-default.conf file,
it looks like this for me:
We just changed an Apache related configuration file. For this reason, we should restart the Apache HTTP server to make sure the changes take effect:
sudo systemctl restart apache2
Generate and install the SSL certificate
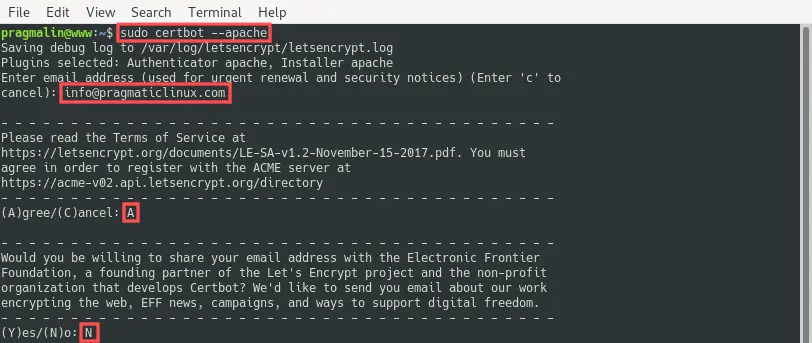
With the Certbot package installed, we can continue with the actual generation and installation of the Let’s Encrypt SSL certificate on the Debian web server. Kick off this procedure by running the command:
sudo certbot --apache
The program asks you a few basic questions. For example your e-mail address, if you accept their terms and services and if you would like to subscribe to their newsletter. Double-check that you entered a valid e-mail address. In case the automatic SSL certificate renewal fails sometime in the future, Let’s Encrypt sends you an e-mail before the SSL certificate actually expires.
CertBot goes
on by extracting the configured ServerName and ServerAlias values
from all enabled Apache virtual host sites. It then lists
these and asks you for which you would like to configure the
SSL certificate, such that secure access via https:
// works. For my server, I selected both
listed names:

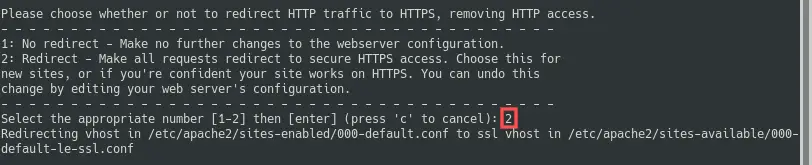
As a final step, Certbot wants
to know if it should add a rewrite rule to the original
Apache virtual host configuration file to automatically
redirect http:// requests
to https://.
I highly recommend this, so select option 2 here:
After a successful completion, the remainder of the output looks like:
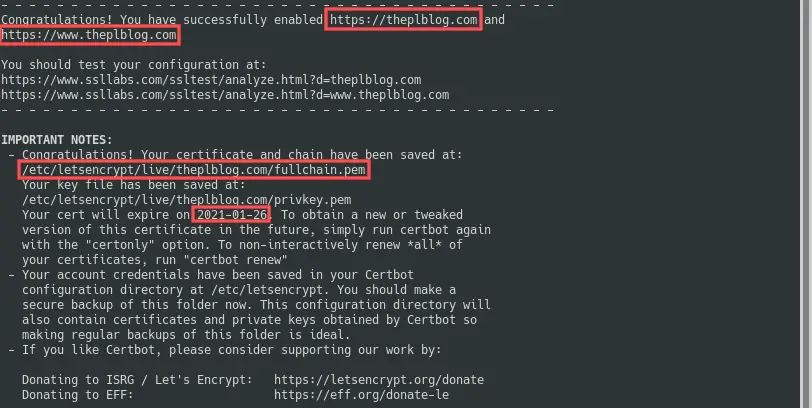
According to the output, Certbot stored
the actual SSL certificate in /etc/letsencrypt/live/theplblog.com/fullchain.pem.
It also automatically configured the Apache virtual host
such that www.theplblog.com and theplblog.com can
now be securely accessed through https://.
Also note that the Let’s Encrypt SSL certificate for the
Debian server is valid for about 3 months. I ran this
command on the 28 of October 2020 and it lists an expiration
date of the 26th of January 2021. We’ll cover automatic
renewal in a bit. Let’s first verify that secure HTTPS
access works.
Verify that secure HTTPS access now works
In
the previous section we ran the Certbot program
to generate and install the Let’s Encrypt SSL certificate on
the Debian web server. Let’s go ahead and verify that it
works. Before jumping right in, keep in mind that Certbot changed
the Apache virtual host configuration file and even added a
new one: 000-default-le-ssl.conf.
Because of this, we should first restart the Apache HTTP
server for the changes to take effect:
sudo systemctl restart apache2
If I
now open up my web browser and enter http://www.theplblog.com (or http://theplblog.com),
I see this:
The Apache HTTP server automatically redirected me to https:// and
used the SSL certificate, as you can see by the little lock
icon on the left side of the URL. In a nutshell: exactly
what we wanted! Visitors of the website can now feel safe
and secure.
Let’s Encrypt SSL certificate renewal on Debian
Remember that the generated SSL certificate expires in three months? Well here’s the cool thing about installing the Let’s Encrypt SSL certificate on Debian, as outlined in this article: a CRON job was automatically added that takes care of the SSL certificate renewal.

Feel free to inspect the /etc/cron.d/certbot file
with the Nano editor. It basically runs the following
command as the root user
twice a day:
certbot
					renew
If
the certificate is within thirty days of expiration, the certbot
renew command automatically renews the
certificate for you. With other words, if you generated and
installed your Let’s Encrypt SSL certificate on your Debian
server as outlined in this article, your system
automatically manages SSL certificate renewal for you. It
doesn’t get easier than that.
I’ve used Let’s Encrypt SSL certificates this way on several production Debian servers in the past four years. The SSL certificate renewal always worked. I do make it a habit to periodically check the expiration date of the SSL certificates, just to make sure. You can run the following command to obtain the current expiration date:
sudo certbot certificates
What to do if the Let’s Encrypt SSL certificate renewal somehow did not work on your Debian server? Not a problem, just run the following command manually:
sudo certbot renew
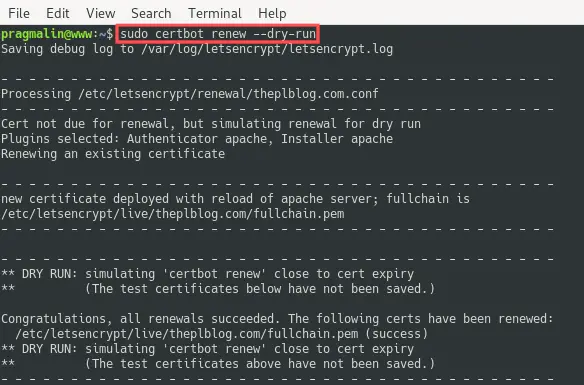
If you just want to see if the renewal process would potentially run without issues, you can do a so called dry run. This simulates the SSL certificate renewal process and you can use it for debugging purposes in case something is wrong:
sudo certbot renew --dry-run